
Inside a Designer Photo Shoot: How I Build Sets with Fabric & Light
Fashion isn’t only about clothes. It’s also about creation, about using fabric, props and imagination to turn a simple studio shoot into a high-fashion designer editorial.
Even if a setup looks simple, trust me, it’s often not. In fact, a designer photo shoot setup that I recently created was one of the hardest that I ever built, and it tested every bit of my patience. But it was also so rewarding in the end.
I’m Daria Koso, a Miami-based photographer, and I’m going to take you through that high-fashion designer editorial and how I built a set that worked so well.
My Model
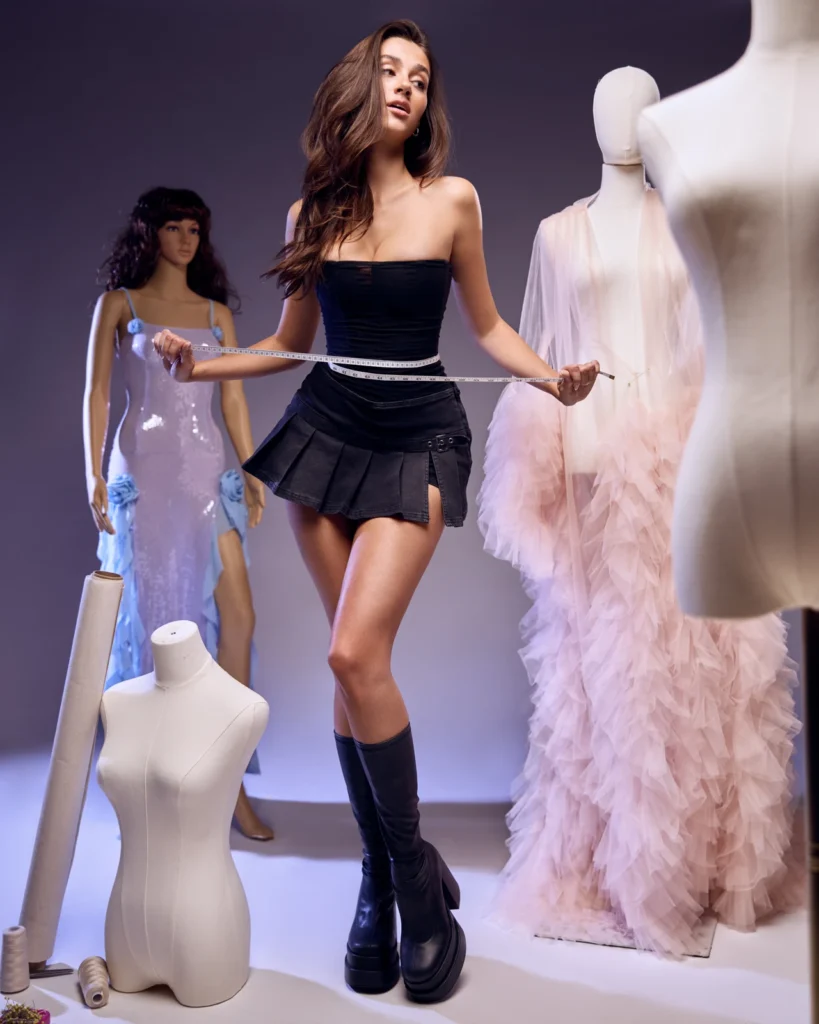
I worked with Risa, which is the name of a mannequin that helped create the overall mood that I was looking for. And she was already wearing a beautiful designer dress as we got ready for our first setup. Risa was not alone though as we also used a few other mannequins, but she was clearly the standout amongst them.
As for humans, Arista Robidas was the gorgeous model who we shot with on this day. And it was nice to hear her talk about how excited she was to work in this type of setup, saying, “I’ve never shot a concept like this. It’s super cool, and I’m really excited to be able to put it in my portfolio.”
Arista and I then discussed potential outfits for her to wear as there were clothing sets that I loved and had cool ideas for. For example, the all-black outfit, including her high boots, that she wore first helped bring an edgy vibe to those initial images that I really liked before she softened her outfits throughout the rest of the shoot.
I also loved the poses and looks that she gave in that first setup. We got so many amazing shots, and there were many more to come.

The First Setup
The lighting that we did for the first setup was very easy. It was arranging the props and creating the overall set design that was the hardest thing, but it all turned out even better than I thought it would.
For the lighting, we used five sources: an octabox as the key light, a rim light, a bluish-purple light for the background and as a rim light depending on where Arista was standing, a spotlight that was aimed at Risa’s face and a more hidden light that provided a little bit of fill from the side.
As for the setup, keep in mind that it takes time to visually build a set and to find the balance between realism and aesthetics while positioning props without clutter. It’s also really important to test how the fabric reacts to light and color. Everything here must serve this story, not distract from it, while the props should guide the eye, frame the model and add layers of realism.
If you’d like to create this type of setup, start with the background: color, texture, fabric and draping. Then, add some main props. A few of ours on this day were our mannequins and a sewing machine. Finish with story details, with smaller props. In our case, we used sketch paper, scissors, loose threads and fabric rolls.
Lastly, step back, check the composition from your camera’s perspective and make any last adjustments before you start shooting.
Adjusting on the Go
Remember that so much of this process involves adjusting on the go. Like for our second setup, I was considering adding some fill light from the side and otherwise reworking things but was unsure how to do it. However, I also trusted and knew that we’d figure it out, and we did.
It’s also important to be comfortable having your model make some adjustments, such as when you realize that a certain look or position would be perfect to shoot next. For example, during the following setup, I had Arista do things that I hadn’t originally planned like rest her chin on the sewing machine and, later, lie down on the table with her legs in front of that sewing machine.
Yes, be detailed with your mood board prior to the shoot, but also be very willing to adjust that vision on the fly. And keep in mind that the more you prepare for the shoot, the better your on-the-fly decisions will be.
The Second Setup
For the second setup, after going back and forth deciding if I should add fill lights or not, I did. I added two. One of them filled in the shadows on the other half of the model’s face while the second was at 20% brightness and filled in the shadows in front of Arista’s face.
We also used a key light to imitate daylight, a rim light that served as a backlight and a spotlight that created shadow play on the background, making it look like the sun was coming in through a window.
Overall, I really liked how this lighting setup created that appearance of beautiful daylight. It was very cool.
For the overall setting, I wanted to use very light colors, nude tones, including for what the model was wearing. That was so that this setup would contrast well with her first outfit and setup, which had created a very editorial, more edgy, scene. I wanted to keep it focused on fashion and lifestyle, just softer.
But we still had some pop for the images with a red dress on one of the mannequins.
Why Do Props Matter?
Props aren’t simply decoration. They’re storytelling tools. They help viewers understand your image’s world. For example, fabric that’s pinned to the wall adds vertical lines and depth while scissors, needles and thread bring authenticity and texture.
How to Use Fabrics
How should you use fabrics? Incorporate movements. Have your model interact with the fabrics. They can hold, pull, twist or walk through them. Doing this brings life to the frame. You can also play with transparency as light that’s passing through thin fabric can create beautiful soft glows or color filters.
Also consider using layering. For example, you can partially hide different textures behind the model in order to add depth. Color strategy can really enhance the scene as well. One way that you can do this is by using the colors of your fabrics to complement or contrast your model’s outfit.
All of that separates editorial from catalog and will help the viewer feel something, which is very important.
Composition and Lighting
The relationship between composition and lighting is crucial. For example, side light emphasizes wrinkles and shape while backlighting softens edges. Avoid flat lighting, which kills the texture.
Lighting fabrics is tricky as they can reflect or absorb light unpredictably. For example, one type can have a completely different reaction to lighting than another.
Before you finalize your setup, test it with a strobe or continuous light.
Conclusion
Every great editorial starts with a good setup, and that’s often the hardest part of the process.
But the time and effort that you devote to this is so worth it.
Get in touch!
Recent Posts
- Frame HER | Episode 1 – Turning a CEO Into a High-Fashion Editorial Model
- Upgrading Studio Lights | NANLITE FC-720B + PavoTube II First Look
- Is Photography Dead in 2026? AI Versus Photographers
- A Photographer’s Truth: Photo Shoots Aren’t Just About Photos
- Behind the Scenes: Creating a Luxury Med Spa Campaign That Doesn’t Look Medical